

Introduction
Ever wondered how to build the perfect PC in 2025 without getting lost in confusing tech terms? This guide is here to make it simple. With new CPU sockets, faster DDR5 memory, and AI-powered processors changing how we use our computers, it’s the perfect time to learn. Whether you’re a first-time builder or upgrading your old setup, this guide breaks everything down in plain, easy words. You’ll discover how to choose the right parts, avoid costly mistakes, and create a system that’s powerful, efficient, and ready for the future — no tech degree required.
The Essential Components — What You Can’t Skip
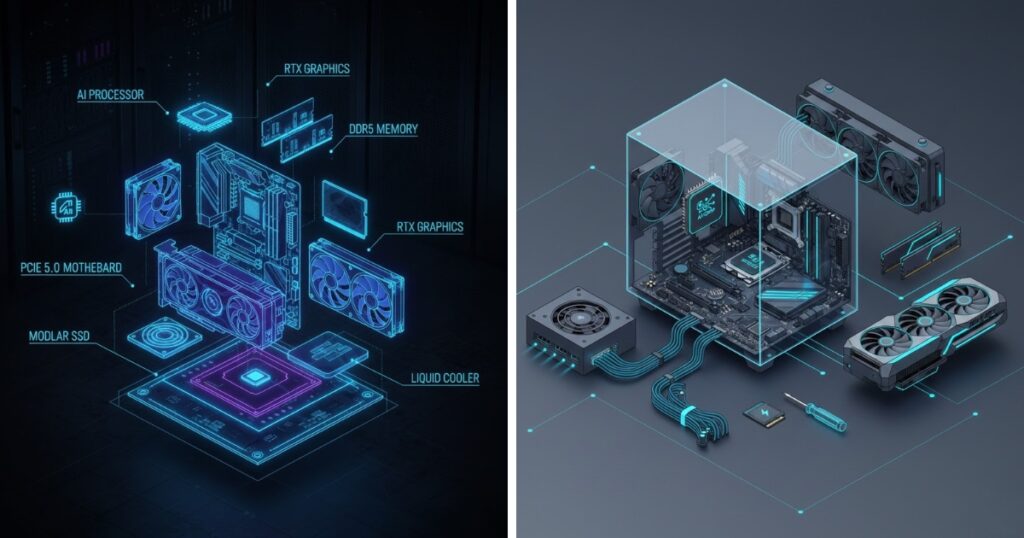
Building a PC is like assembling a puzzle where every piece matters. Each component has a specific role, and if one doesn’t fit or perform well, your whole system suffers. Let’s break down the must-have parts that form the backbone of every computer.
CPU (Processor) — Its Role & How to Pick One

The CPU (Central Processing Unit) is the brain of your PC. It’s responsible for handling instructions, running applications, and managing tasks. Think of it like a chef in a kitchen — it coordinates everything, making sure your computer runs smoothly.
In 2025, you’ll mainly be choosing between AMD Ryzen 9000 series and Intel Core Ultra / 15th Gen CPUs. Both are powerful, but each has unique strengths:
- Intel: Great for gaming and multitasking thanks to high single-core speeds and AI acceleration.
- AMD: Excellent for creators and heavy workloads, often offering better efficiency and more cores for the money.
When picking a CPU, consider these factors:
- Use Case:
- Gaming → prioritize higher clock speed and fewer cores.
- Content creation or AI workloads → go for more cores and threads.
- Gaming → prioritize higher clock speed and fewer cores.
- Socket Compatibility:
Each CPU fits into a specific socket. Intel’s LGA 1851 and AMD’s AM5 are the current standards. Always ensure your motherboard matches. - Integrated Graphics:
Some CPUs include built-in graphics (Intel “iGPU” or AMD “APU”), useful for budget builds or troubleshooting without a GPU. - Budget vs Performance:
Spending an extra $50–$100 can future-proof your system for years.
Pro tip: For most users, a midrange CPU like the Ryzen 7 9700X or Intel Core i7-15700K strikes the perfect balance between power and cost.
Motherboard — Compatibility, Form Factors, and Feature Sets
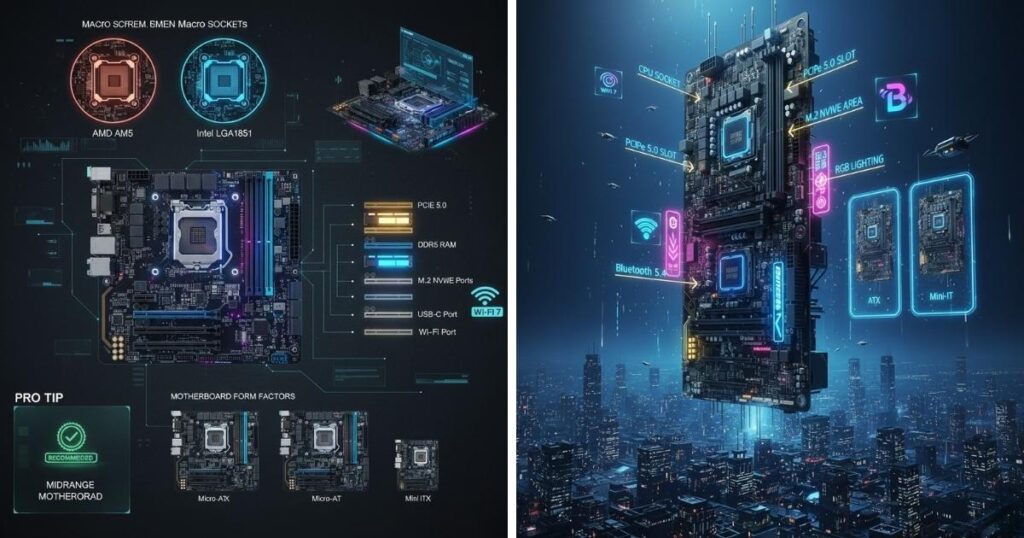
If the CPU is the brain, the motherboard is the skeleton — it connects and supports every part of your PC. It determines what hardware you can use and how well your system can grow in the future.
Key things to consider:
- Socket & Chipset:
- AMD AM5 supports Ryzen 7000/8000/9000 CPUs.
- Intel LGA 1851 supports 14th–15th Gen Core CPUs.
Choose the right one for your processor.
- AMD AM5 supports Ryzen 7000/8000/9000 CPUs.
- Form Factor:
- ATX: Full-sized, best for expandability.
- Micro-ATX: Slightly smaller, fewer slots.
- Mini-ITX: Compact builds, limited ports.
- ATX: Full-sized, best for expandability.
- Features:
- PCIe 5.0 slots for next-gen GPUs and SSDs
- DDR5 RAM support
- M.2 NVMe slots for fast storage
- USB-C ports, Wi-Fi 7, Bluetooth 5.4, and Thunderbolt options
- PCIe 5.0 slots for next-gen GPUs and SSDs
- Aesthetics & BIOS:
New boards now offer customizable RGB, sleek designs, and intuitive BIOS interfaces that make setup a breeze.
Pro tip: Don’t overspend here — midrange boards often include everything you need. But never cheap out completely; a reliable motherboard ensures system stability and easy future upgrades.
Memory (RAM) — Capacity, Speed, and Channel Configuration
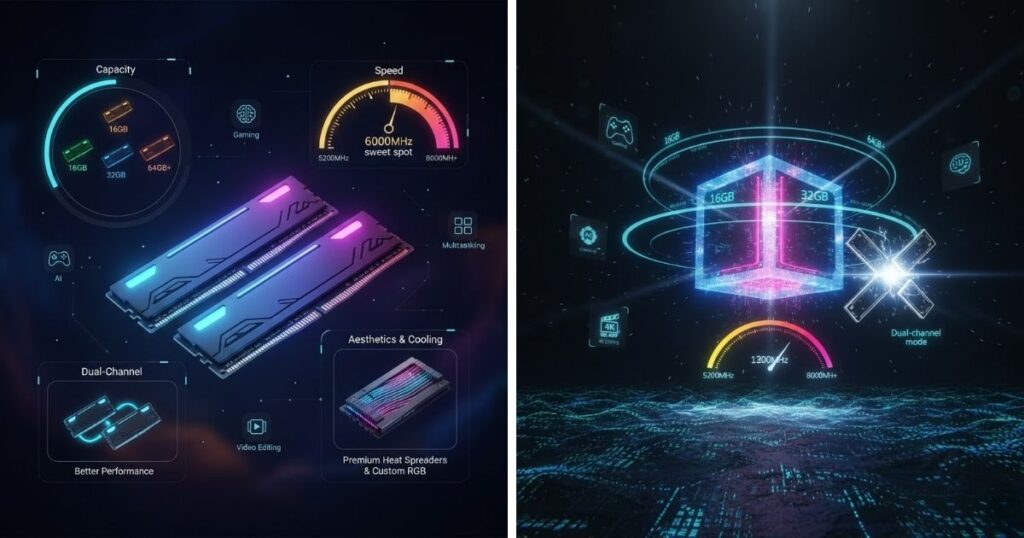
RAM (Random Access Memory) is your PC’s short-term memory — it holds data your system needs right now. More RAM means smoother multitasking and faster response times.
In 2025, DDR5 is king. It’s faster, more efficient, and now affordable compared to early releases. While DDR4 is still supported on older boards, DDR5’s bandwidth gives noticeable performance gains in gaming, AI, and creative tasks.
Here’s what to focus on:
- Capacity:
- 16GB: Basic use or entry-level gaming
- 32GB: Ideal for gaming, content creation, and streaming
- 64GB+: Heavy multitasking, 3D rendering, AI workloads
- 16GB: Basic use or entry-level gaming
- Speed:
DDR5 speeds range from 5200MHz to 8000MHz+. Aim for at least 6000MHz with low latency for best performance. - Channel Configuration:
Always use dual-channel (two sticks) for efficiency. Pairing two 16GB sticks (instead of one 32GB) boosts data throughput. - Aesthetics & Cooling:
Some RAM sticks feature heat spreaders and RGB lighting — great for aesthetics, but not essential.
Pro tip: If you’re using AI tools or editing 4K video, go for 32GB or more. You’ll thank yourself later.
Storage — NVMe SSD, SATA SSD/HDD, and When to Use Which
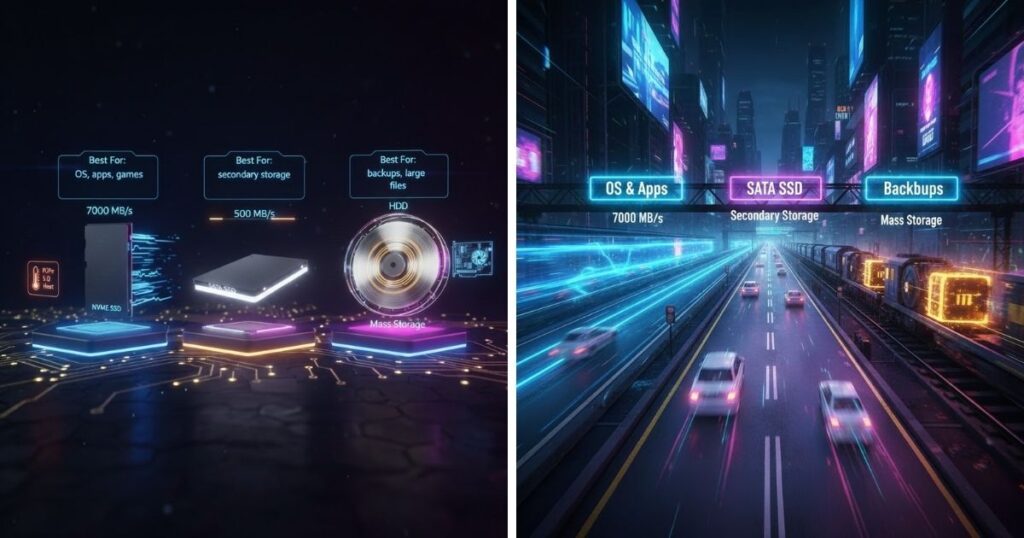
Your storage determines how fast your system boots and loads applications. In 2025, NVMe SSDs will have become the standard, offering speeds up to 7000 MB/s — that’s lightning-fast compared to traditional drives.
Here’s a breakdown:
- NVMe SSD (PCIe 4.0 or 5.0):
Best for operating systems, games, and apps. Extremely fast but pricier per GB. - SATA SSD:
Slower (around 500 MB/s) but more affordable. Good for secondary storage. - HDD (Hard Disk Drive):
Best for mass storage like backups, large files, and media libraries. Mechanical and slower, but very cost-effective.
Recommended setup:
Use a 1TB NVMe SSD for your OS and frequently used apps, plus a 2TB HDD or SATA SSD for extra storage.
Pro tip: Always check your motherboard’s available M.2 slots and ensure there’s proper cooling for high-speed drives, especially PCIe 5.0 SSDs — they can get hot.
Power Supply (PSU) — Wattage, Efficiency, Connectors
Your PSU is like your system’s heart, delivering power to every component. A poor-quality PSU can cause instability or even damage your parts — so never cheap out here.
Key factors:
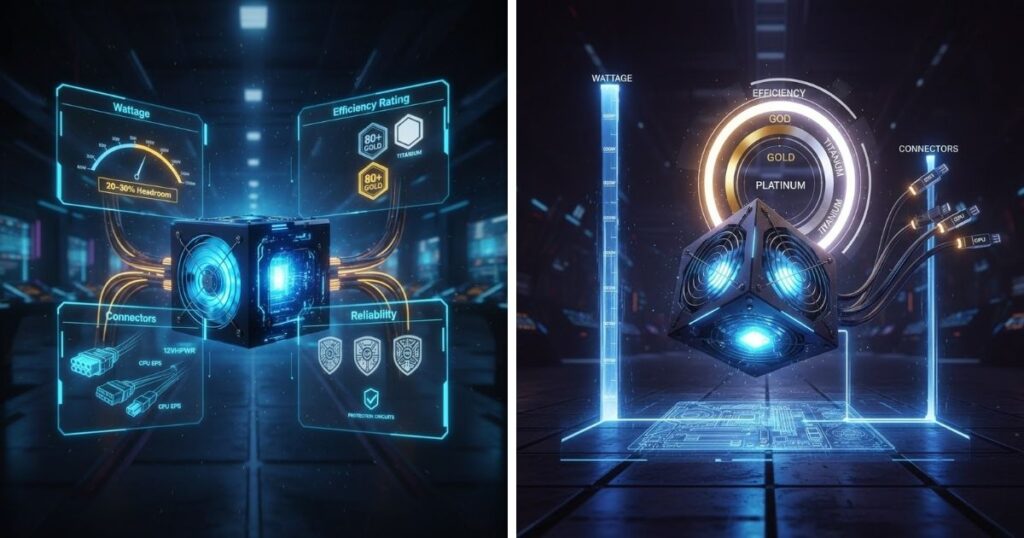
- Wattage:
Determine how much power your build needs using a PSU calculator. Most systems require between 650W–850W, while high-end gaming rigs or AI workstations may need 1000W+. - Efficiency Rating:
Look for 80+ Gold or better (Platinum/Titanium). These ratings mean the PSU wastes less energy as heat. - Connectors:
Ensure it has the right cables for your GPU (12VHPWR for newer cards), CPU, and motherboard. Modular PSUs let you use only the cables you need — keeping the build cleaner. - Reliability:
Stick to trusted brands like Seasonic, Corsair, or EVGA. They include better protection circuits and warranties.
Pro tip: Always get a PSU with about 20–30% more wattage than you need — this ensures headroom for future upgrades and stable power delivery
Case — Fit, Airflow, and Layout
Your PC case isn’t just a metal box — it’s your system’s home. A good case affects airflow, temperature, cable management, and even noise levels. In 2025, case design has become smarter, quieter, and more modular, offering tool-free panels and hidden cable routes.
Here’s what to focus on:
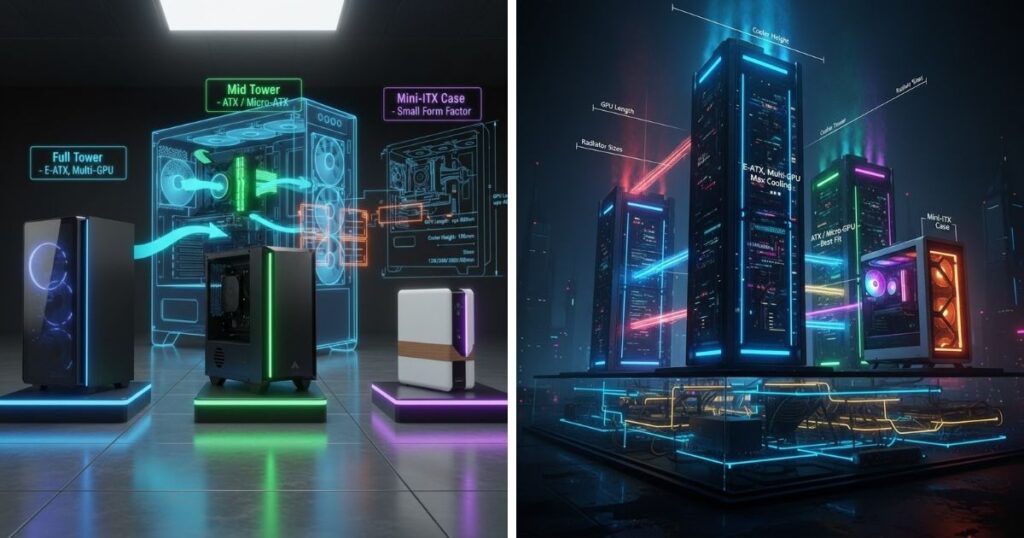
- Size and Compatibility:
- Full Tower: Fits large E-ATX boards and multiple GPUs. Ideal for enthusiasts.
- Mid Tower: The most popular size; fits ATX and Micro-ATX boards.
- Mini Tower / ITX: Compact builds, portable but harder to manage cooling.
- Full Tower: Fits large E-ATX boards and multiple GPUs. Ideal for enthusiasts.
- Always check GPU length, cooler height, and radiator support before buying.
- Airflow:
Look for mesh fronts, dust filters, and multiple fan mounts. Proper airflow keeps components cool and quiet. Cases with tempered glass side panels are stylish but need smart fan placement. - Cable Management & Layout:
Hidden PSU shrouds, cable channels, and Velcro straps make your build look professional and organized. Modular cases even let you reposition drive cages and fan mounts for custom layouts. - Aesthetics:
RGB lighting, glass panels, and minimalist fronts are trendy — but focus on functionality first. You can always add lighting later.
Pro tip: A well-ventilated mid-tower case like the Fractal Design North or Lian Li Lancool series gives the best balance between style, airflow, and space.
Cooling — Air, AIO, Custom Water Cooling
Keeping your PC cool ensures stability and longevity. Whether you’re gaming, editing videos, or running AI models, efficient cooling is a must.
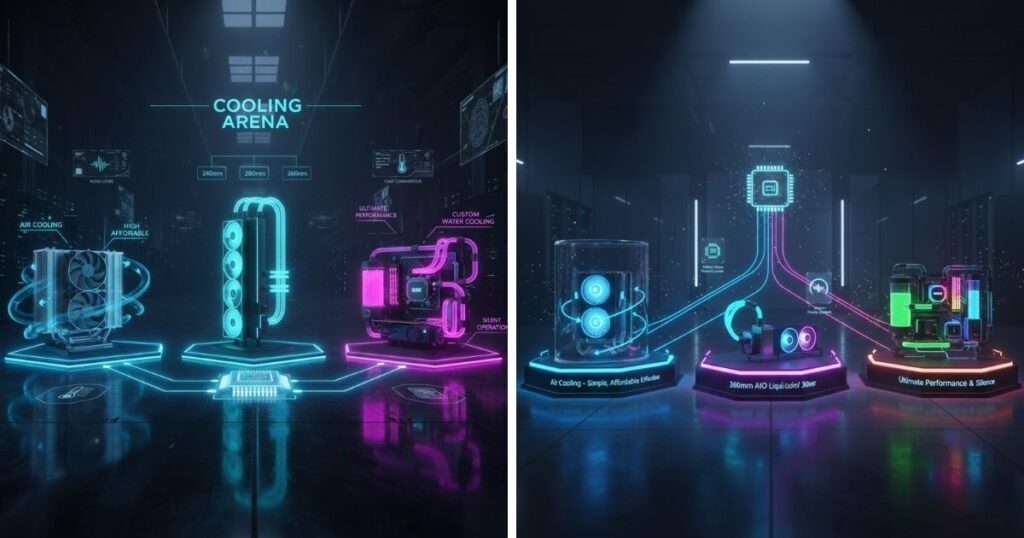
There are three main cooling options in 2025:
- Air Cooling:
- Affordable, simple, and effective for most users.
- Tower coolers like the Noctua NH-D15S or DeepCool AK620 perform impressively well.
- Choose one with good clearance for RAM and tall cases.
- Affordable, simple, and effective for most users.
- AIO (All-in-One Liquid Cooling):
- Combines performance and aesthetics.
- Ideal for overclocked CPUs or compact builds.
- Available in 240mm, 280mm, or 360mm radiator sizes.
- Watch for pump noise and ensure your case supports the chosen radiator length.
- Combines performance and aesthetics.
- Custom Water Cooling:
- The ultimate for enthusiasts who want top performance and a clean look.
- Expensive and complex, but unbeatable cooling and silence.
- The ultimate for enthusiasts who want top performance and a clean look.
Pro tip: A quality air cooler is usually enough for most builds. Go AIO only if you want quieter operation or extra thermal headroom. Always use thermal paste correctly — a pea-sized dot in the center of your CPU works best.
Graphics Card (GPU) — When You Need One, and What Specs to Look For
The GPU (Graphics Processing Unit) is the engine of visual performance. It’s crucial for gaming, 3D modeling, and AI tasks. In 2025, NVIDIA’s RTX 5000 series and AMD’s RX 8000 lineup will set new standards, with AI acceleration and improved ray tracing.
When do you need a GPU?
If you’re gaming, doing creative work, or running AI workloads — absolutely. If you’re just browsing, studying, or coding lightly, modern CPUs with integrated graphics can handle basic display needs.
Key GPU specs to understand:
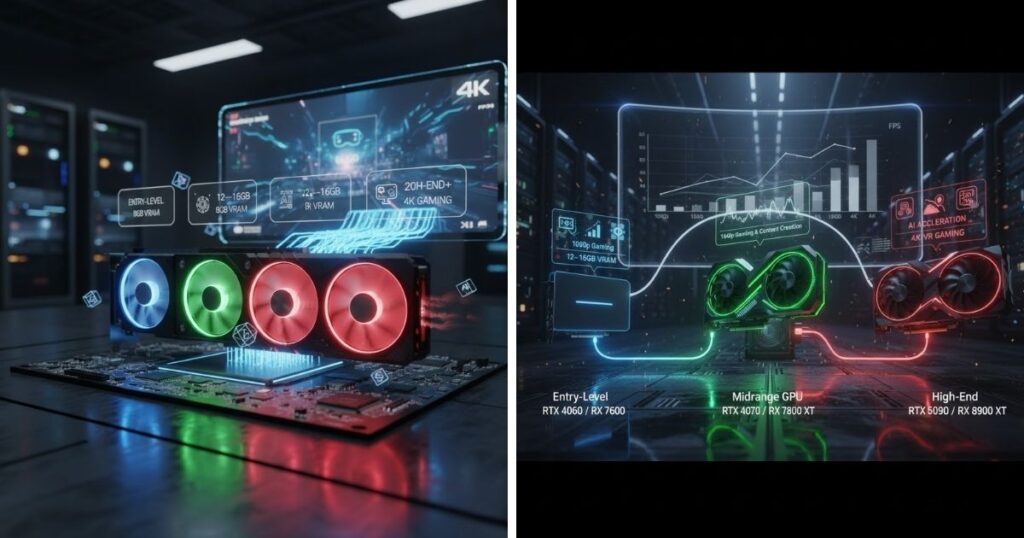
- VRAM:
More VRAM allows smoother performance at higher resolutions.
- 8GB: 1080p gaming
- 12–16GB: 1440p and creative workloads
- 20GB+: 4K gaming, AI models, and rendering
- 8GB: 1080p gaming
- Performance Tier:
- Entry Level: RTX 4060 / RX 7600 — great for budget builds
- Midrange: RTX 4070 / RX 7800 XT — perfect balance of performance and price
- High-End: RTX 5090 / RX 8900 XT — for 4K, VR, and AI workloads
- Entry Level: RTX 4060 / RX 7600 — great for budget builds
- Power & Cooling:
Newer GPUs use the 12VHPWR connector, so ensure your PSU supports it. Cooling systems (dual or triple fans) make a big difference in temperature and noise. - AI and Productivity Features:
NVIDIA’s Tensor Cores and AMD’s AI accelerators boost rendering, video editing, and even frame generation in games.
Pro tip: Match your GPU to your monitor. There’s no sense in pairing a 4K 240Hz screen with an entry GPU — or a top-tier card with a 1080p display.
Operating System & Peripherals — Keyboard, Monitor, Mouse, Cables

Once your core components are ready, you need an operating system (OS) and peripherals to bring everything to life.
- Operating System:
- Windows 11: The most compatible for gaming and productivity. Now optimized for AI workloads and DirectStorage 2.0.
- Linux (Ubuntu, Pop!_OS): Great for developers or privacy-focused users.
- macOS (Hackintosh): Rarely worth it now — not recommended for most.
- Windows 11: The most compatible for gaming and productivity. Now optimized for AI workloads and DirectStorage 2.0.
- Always install your OS on your fastest NVMe SSD for instant boot times.
- Peripherals:
- Monitor: Match refresh rate and resolution with GPU power. 144Hz at 1440p is the current sweet spot.
- Keyboard: Mechanical keyboards remain popular for feel and durability.
- Mouse: Choose based on grip style and sensitivity (DPI).
- Headset: Look for comfort and clear mic quality for communication.
- Monitor: Match refresh rate and resolution with GPU power. 144Hz at 1440p is the current sweet spot.
- Cables & Accessories:
Invest in quality DisplayPort or HDMI 2.1 cables. Cheap cables can cause flickering or signal loss. Cable organizers and USB hubs keep your setup tidy.
Pro tip: Don’t underestimate ergonomics — a good monitor stand, comfortable chair, and cable management can make or break your setup experience.
Compatibility & Selection Rules
Before buying your PC parts, it’s important to make sure everything fits and works together. Compatibility issues are the number one mistake new builders make, but don’t worry — checking a few key details will save you time, money, and frustration.
CPU ↔ Motherboard Socket & Chipset Matching
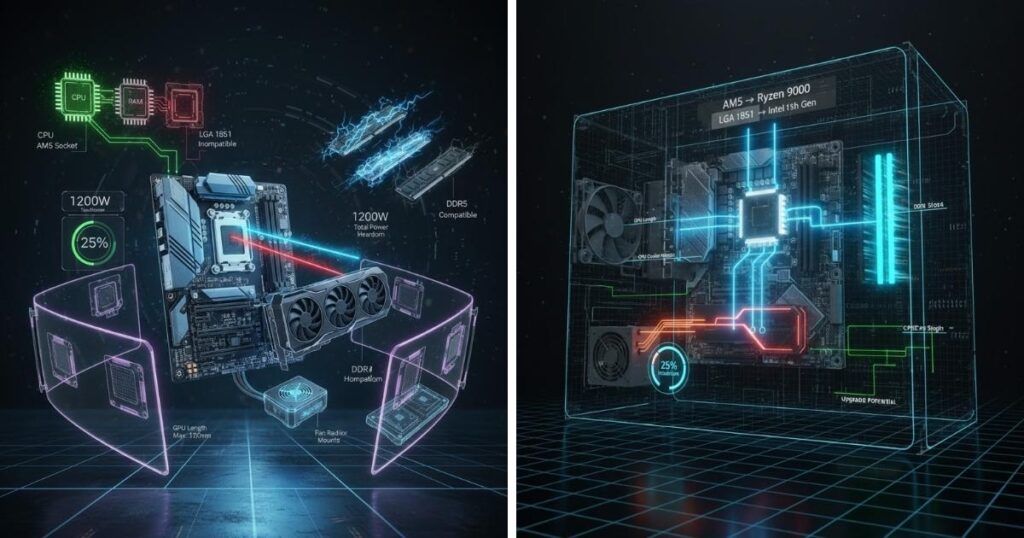
Your CPU must match your motherboard’s socket type. For example, AMD’s new Ryzen 9000 series uses the AM5 socket, while Intel’s 15th Gen processors use LGA 1851. Also, look at the chipset — it decides what features your board supports, like overclocking or PCIe 5.0. Always double-check the motherboard’s CPU compatibility list before buying.
RAM Type vs Motherboard (DDR4 vs DDR5)
Motherboards only support one type of memory — either DDR4 or DDR5, not both. DDR5 is faster and more efficient, so it’s the best choice for new builds in 2025. Check the motherboard’s manual to confirm the supported RAM type and speed.
Power Requirements: GPU, CPU, and Headroom
Your power supply (PSU) needs enough wattage for all your parts. Add up your GPU and CPU’s power needs, then add 25% extra for safety. This “headroom” ensures smooth performance and room for future upgrades.
Physical Constraints: Clearance, Slot Spacing, Case Dimensions
Make sure your parts physically fit inside your case. Check GPU length, CPU cooler height, and available space for fans or radiators.
Future-Proofing: Upgrade Paths, Extra Slots, Modular Designs
Choose parts with upgrade options — extra RAM slots, spare M.2 ports, and modular PSU cables. This keeps your PC ready for future tech without replacing everything.
Sample Builds for Different Use Cases
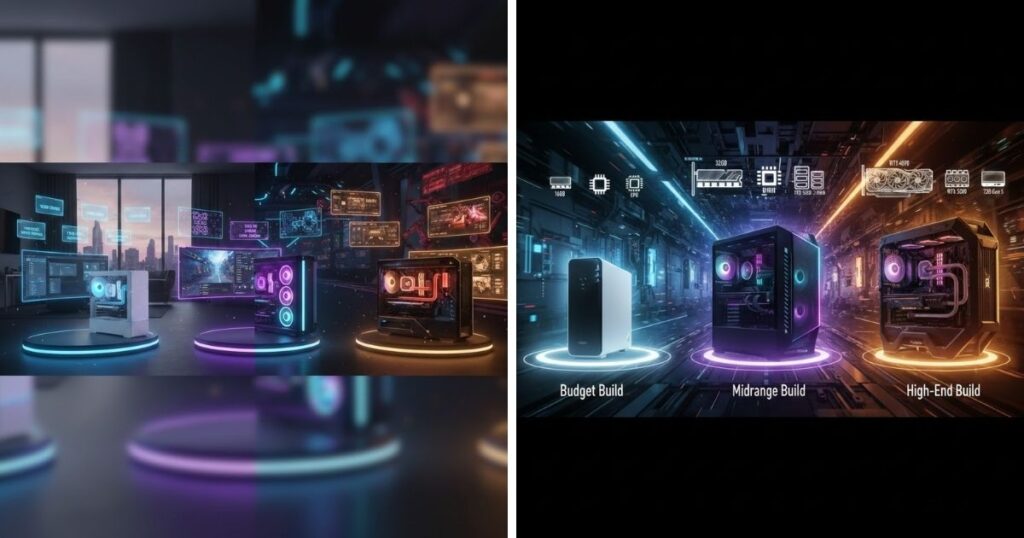
Building a PC depends on your needs and budget. Whether you just want a reliable computer for daily tasks or a powerful setup for gaming and AI work, here are three simple build ideas for 2025.
Budget Build (Entry Gaming / Productivity)
A budget build gives you great everyday performance without overspending. Use a Ryzen 5 8600G or Intel i5 with built-in graphics, 16GB of DDR5 RAM, and a 1TB NVMe SSD for speed. Pair it with a 650W power supply and a mid-tower case. It’s perfect for students, light gaming, and office tasks.
Midrange Build (Gaming + Content Creation)
For gamers or creators, go for an Intel i7-15700K or Ryzen 7 9700X, 32GB DDR5 RAM, and an RTX 4070 GPU. Add a fast 1TB SSD plus a 2TB HDD for extra storage. This setup handles 1440p gaming, video editing, and streaming smoothly.
High-End Build (4K/VR / AI / Heavy Workloads)
If you want top-tier performance, choose a Ryzen 9 9950X or Intel i9-15900K, 64GB RAM, and an RTX 5090 GPU. Include a 2TB Gen 5 NVMe SSD and a 1000W PSU. This powerhouse is built for 4K gaming, AI projects, and demanding creative software — fast, cool, and future-proof.
Step-by-Step Build Process (Overview)
Building a PC might look tough at first, but it’s actually quite fun once you know the steps. Here’s a simple and human-friendly overview to help you through the process — even if it’s your first time.
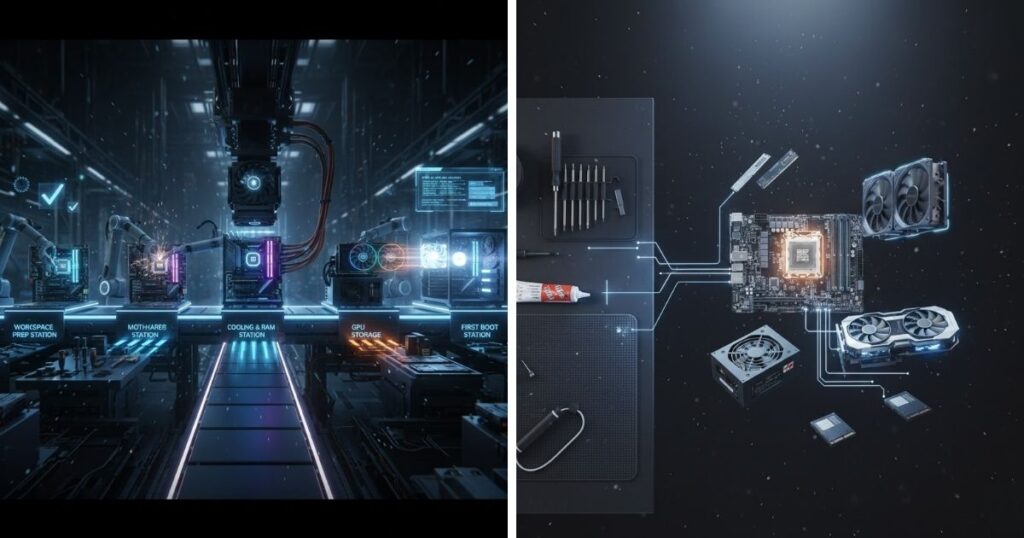
Preparing Your Workspace & Tools
Start by setting up a clean, flat surface to work on. Avoid carpets to prevent static electricity. Gather your tools — mainly a screwdriver, thermal paste (if not pre-applied), and cable ties. Make sure you have all your components ready: motherboard, CPU, RAM, GPU, PSU, storage, and case. A calm, organized setup makes everything easier.
Installing CPU, Cooler, and RAM on the Motherboard
Place your motherboard in its box or on an anti-static mat. Carefully lift the CPU socket latch and align your CPU using the small arrow marker. Gently place it in, then close the latch. Next, apply thermal paste if needed and attach the CPU cooler firmly. Install your RAM sticks into the correct slots (usually the second and fourth). You’ll hear a satisfying click when they’re seated properly.
Mounting the Motherboard in the Case & Connecting the PSU
Place the motherboard inside your case and align it with the standoffs. Screw it in gently — don’t overtighten. Then, install the power supply unit (PSU) at the bottom or top, depending on your case. Connect the main power cables (24-pin and 8-pin CPU). Keep cables tidy using ties or built-in channels.
Installing GPU, Storage, and Cable Organization
Slide your graphics card (GPU) into the top PCIe slot and secure it with screws. Connect the power cable from the PSU to your GPU. Install SSDs or HDDs in their slots and connect them with SATA or NVMe cables. Finally, organize your cables for good airflow and a clean look.
First Boot, BIOS Configuration, and OS Installation
Power up your PC! Enter the BIOS by pressing Delete or F2. Check if all hardware is detected. Set your boot drive and install your operating system using a USB. Once done, install drivers and enjoy your brand-new custom PC!
Troubleshooting & Common Pitfalls
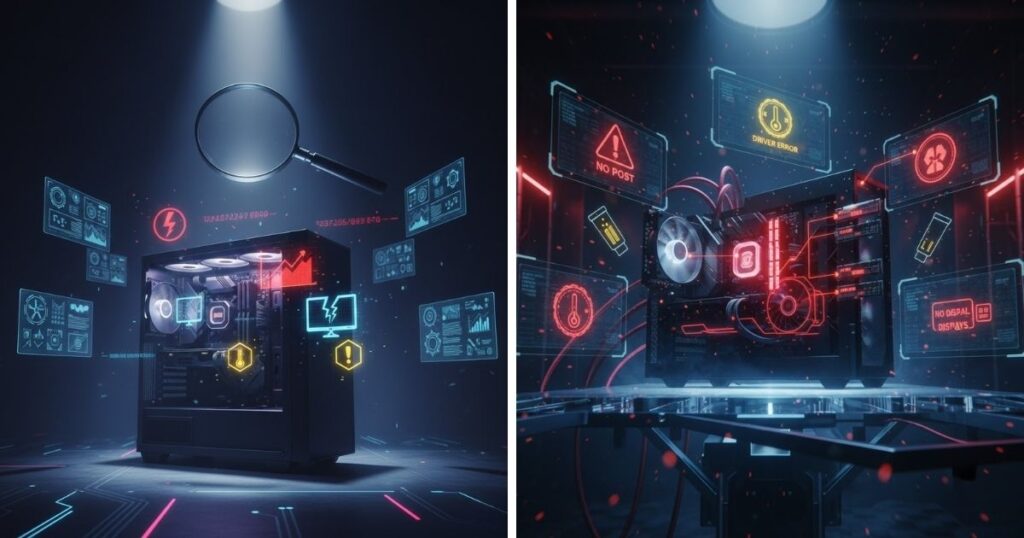
Even with careful planning, small issues can happen during or after building your PC. Don’t panic — most problems are easy to fix once you know where to look. Here’s how to solve the most common ones.
No Power / No Boot / No POST
If your PC doesn’t turn on, first check if the power cable and the switch on the back of the PSU are on. Make sure the front panel connectors are plugged into the right motherboard pins. If the fans spin but there’s no display, double-check RAM and GPU seating. Sometimes, simply re-plugging components solves the issue.
Beep Codes, Motherboard LEDs, Diagnostic Cards
Many motherboards have small lights or beep codes that signal what’s wrong — like missing RAM, CPU issues, or GPU errors. Check your motherboard manual to decode these signals. Some builders also use a POST diagnostic card for extra help.
Temperatures Too High or System Instability
If your system overheats or crashes, make sure the CPU cooler is firmly attached and thermal paste is applied correctly. Also, ensure fans are facing the right direction for airflow.
Peripheral Detection Issues or Driver Conflicts
If your keyboard, mouse, or Wi-Fi isn’t working, reinstall or update drivers. Using Windows Update or the manufacturer’s websites usually fixes it fast.
Conclusion
Building your own PC is one of the most rewarding tech experiences you can have. You’ve learned how to prepare, assemble, and troubleshoot your system — from installing the CPU to organizing cables and setting up your OS.
Now it’s your turn! Share your build plans or budget ideas in the comments — your experience might inspire someone else to start their own build journey.
To make things even easier, grab our printable PC Build Checklist to keep track of every step and component. It’s a simple way to stay organized and confident throughout the process.
FAQ — Quick Answers to Common Questions
Do I always need a GPU?
Not necessarily! Many modern CPUs come with built-in graphics, especially Intel processors and AMD Ryzen “G” series chips. These are perfect for daily tasks, browsing, and light gaming. However, if you plan to play modern games, edit videos, or use 3D software, you’ll definitely want a dedicated graphics card for smoother performance and better visuals.
Is DDR4 still viable in 2025?
Yes, DDR4 RAM is still a strong and affordable option. While DDR5 offers faster speeds and better efficiency, the real-world difference isn’t huge for most users. If you already have DDR4 parts or are building on a budget, it’s perfectly fine to stick with it. For high-end systems or future-proofing, DDR5 is a great choice.
How many watts should my PSU be?
Power supplies are the backbone of your system. A 600–750W PSU works well for most mid-range to high-end PCs. If you’re using powerful GPUs or plan to upgrade later, consider going a bit higher. Always choose a reliable brand with at least an 80+ Bronze efficiency rating for safety and stability.
Can I reuse old parts?
Absolutely! You can reuse older storage drives, cases, fans, and even power supplies — as long as they’re still working and compatible with your new hardware. It’s a great way to save money and reduce waste.
What tools do I need?
You don’t need much! A Phillips screwdriver, good lighting, and a little patience will get you through most of the build. Optional tools like anti-static wristbands and cable ties just make things neater.